15 Tips for Moving Data Between Web Monitoring Providers and Uptime.com
Migrations carry a setup cost and engineers don’t work for free. Even under the most ideal conditions, it’s possible moving data between web monitoring providers will result in some missing feature or differing functionality.
That’s just life.
If you’re facing a migration you sometimes have to make do with the cards you’re dealt. But it’s not all doom and gloom! We hope this checklist will help you play like you’ve got pocket aces.
Table of Contents
- Start Moving Data From Your Web Monitoring Provider
- Create Test Checks for Your Most Important Components
- Reach Out to Support
- Configure Multiple Contacts for Alerts
- Use Your Uptime.com Status Page
- Create Contacts for Incident Management
- Configure SSO for a Secure Login Experience
- Expedite Setup with Monitor Entire Site
- Read Uptime.com Documentation
- Migrate your Status Page Subscribers
- Download the Uptime.com Mobile Application
- Review an Uptime.com Alert
- Review Real-Time Analysis
- Add a RUM Check
- Audit Your Account for Completeness
Start Moving Data From Your Web Monitoring Provider
One sure way to smooth the migration process is by not starting from scratch. If you can, extract your existing data from your provider. Uptime.com has bulk import tools that offer a fast method for replicating your existing settings.
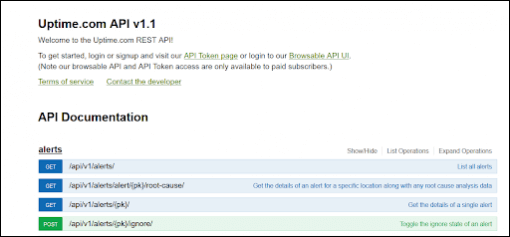
You will need to check the fields are consistent with our system, but setup is simple. Upload an XLS spreadsheet, which can contain up to 200 checks simultaneously. Keep in mind you can also use our bulk upload to preserve any escalations or maintenance windows you may have set. If you prefer working from the command line, our API is available.
What about your Status Page, or contact information? Existing Status Page CNAMEs you were using can be redirected to cname.uptime.com once you create a Status Page on the Uptime.com side. Existing integrations are easy to setup in Uptime.com, but more on contacts later.
Finally, it’s helpful to import your existing users. If you decide Uptime.com is right for you, you’ll want confirmation that everyone can utilize the system.
Create Test Checks for Your Most Important Components
Everyone has a devops horror story, so what would wake you up in the dead of night? Whatever the nightmare was that triggered your search for us, or any other provider, should be among the first checks you configure in our system.
Migration Rule 1: verify your must-haves are working before you proceed with the service.
Prepare for technical difficulties should always be a mantra when jumping to a new provider. Share your uptime monitoring end goals with our team, we know our system well and may have ideas on how our service can work for you that differ from what your previous providers offered.
Reach Out to Support
I am among a host of support representatives waiting to give you top tier service. We brag a little, but we are one of the top monitoring providers for support with good reason:
- We aim for rapid response
- We aim to resolve your issue
- We work with your team for the best possible outcomes
That effort extends to our documentation, which grows alongside your use cases and feedback. We make special efforts to include examples in every document, and code wherever relevant.

Something missing? Let us know!
Ease of use is our goal, but building a powerful service means options, and options mean complexity. Our role is to bridge that gap and help you work through any technical issues.
Configure Multiple Contacts for Alerts
Here is a common occurrence that is completely avoidable:
You have an SSL certificate that goes down and needs renewal. The problem is you need it yesterday, and the person who can pay for the certificate and renew it to get this done was not reachable and has already gone home.
What if, instead you pushed an alert that the SSL will fail directly to this user? Then, because you know this user can be difficult to track down, you escalate to your manager or to theirs?
But how do I, a mortal DevOps engineer, achieve this level of bureaucratic mastery, I can hear you asking. Well, we have the answer: Configure multiple contact points and escalations.
Here’s how that works:
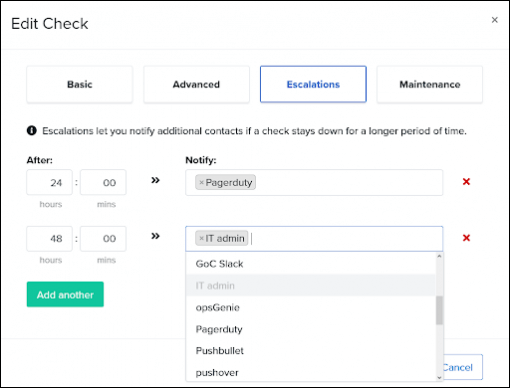
Configure your SSL check to alert the IT admin if the check has been down for 48 hours. Use one of our integrations and push a notification after 24 hours to your preferred service, PagerDuty in this case. Everyone who can act on the problem has visibility in the time it takes to setup the check.
Sweet!
Use Your Uptime.com Status Page
Transparency can save money in the long run. Even if it’s down, users won’t ping your support about the problem if you can redirect them to your status page. Part of your migration should include configuring your core components and testing out a status page.
We recommend you use a non-public status page for internal review to get started. Remember that brand-free reporting is also available, so it’s helpful to customize your page before you launch it. Simply tick a box, and you’re on the tubes of the internet!
Here is a quick and easy starter setup:
- Enable your Current Status tab
- With metrics
- With global status
- Configure checks to components, with or without an automated state change.
Later, you can add things like the History tab, or outside components.
But Status Page setup takes time, why should I do it? The simple answer is transparency, but let’s dig into what happens if you don’t. When downtime occurs, you can kiss any free time your support team had goodbye, they will be busy fielding tickets about the outage. Plan on spending some of your downtime, (which really should be used for diagnosis and fixing the issue), on informing higher ups. They will want to know why the business has suddenly stopped generating revenue.
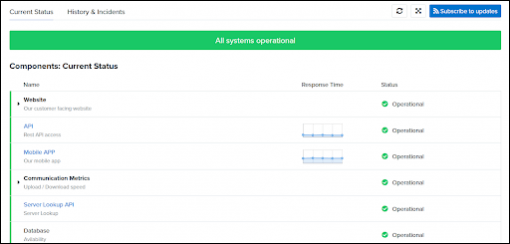
The reason why we think you should use our Status Page is a simple one: it’s powered by data you’re already generating as an Uptime.com user. Your components can automatically respond to an outage, setting status to Degraded performance or Major outage without human intervention
Incident management and communication saves money. If you’re in front of the incident, you become the news source.
Create Contacts for Incident Management
What we’re really getting at here is this: you should never need to manually inform someone of an outage. Sorry if I killed your water cooler downtime gossip pow wow, but isn’t it best you spend your time actually fixing the problem?
To fix effectively, you need to remove the “you” from incident response.
Generating and delivering alerts to your contacts is your most effective tool in that struggle. If your shopping cart or blog goes down, and your alert goes to your Jira board where everyone has visibility, it’s easier to designate or hold someone accountable for fixing that thing.
If the end user is an Uptime.com user on your account, he or she can venture deeper into real-time analysis for a clearer picture of the outage. If the end user is a support representative, he or she is now blessed with the knowledge of this outage and can relay its technical details forthwith. If the user is a tier X support representative, congratulations you have successfully escalated the issue with no human intervention.
The bottom line: you get more value from our service when you configure contacts to improve time to respond.
Configure SSO for a Secure Login Experience
Single Sign On is useful for businesses of all sizes, as it consolidates user logins and creates “safe” apps with permissions that are easy to control. This should not be one of your first items, but it is worth doing.
Users are also created automatically within Uptime.com when you use SSO. For enterprise users, who may be considering adding entire teams of people, this functionality allows administrators the ability to quickly allocate accounts and set permissions.
Uptime.com also has applications for use with AWS and OneLogin, along with instructions for Okta. Our support team is also well versed in most major SSO providers. Try us out!
Expedite Setup with Monitor Entire Site
Monitor Entire Site is great for your core domain, and can help businesses of any size get up and running quickly with Uptime.com. Our system identifies checks it sees as potentially useful to you. You simply pick and choose the ones you want, or just benefit from the overall picture of your domain’s health.
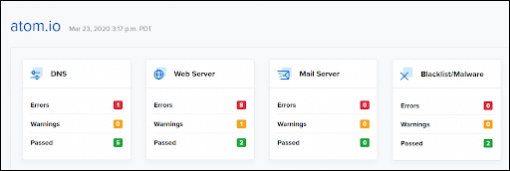
Run Monitor Entire Site periodically and check on your domain, or use it to spot check errors like SSL and DNS.
Read Uptime.com Documentation
Our Quickstart Guide is a good place for new users to start. Located here in support, and delivered to every new user via email PDF, the guide walks users through:
- Major check types
- Reporting
- Alerting
- Account setup (such as contacts and users)
Here is our Overview of Check Types, and our articles on basic check fields and Advanced options. Our integration provider setup instructions can walk you through the setup process. Simply click the provider you need to get started.
Migrate your Status Page Subscribers
Similar to our bulk check upload process, you can upload any existing Status Page contacts into our system. All you need to get started is a spreadsheet of email addresses, and our template for bulk importing subscribers. See your Status Page and Manage Subscribers for more details.
Download the Uptime.com Mobile Application
The Uptime.com mobile application is available on both the iOS app store and Google Play. Users can monitor checks and receive push notifications for up and downtime alerts, so you can manage your alerts and checks on the go.
Review an Uptime.com Alert
You should generate an alert, either via running a gameday exercise or just using our Up/Down tester, and review its results. Doing so is good for testing out the data your team will receive when an outage is detected, but it’s also useful for testing your contact points.
For example, you can create an Up/Down tester request for 1 outage per hour lasting thirty minutes. Then you can create a check for it, assign contacts to it, and play with various states. Do you want to escalate to your Slack channel? Do you want to designate a maintenance window? How does that influence your reporting? These small details will help you determine whether Uptime.com is really the best fit for you.
Review Real-Time Analysis
Did you know that all Uptime.com alerts feature real-time analysis to chart the outage? Real-time analysis is a chronological timeline of your most recent outages, with alerts readily accessible. You can also load the status of your probes, which can clue you into whether a check is recovering or if all locations are seeing the same error.
Accessible from every alert notification, real-time analysis helps boost your downtime awareness with technical details that tell the story of your downtime.
Add a RUM Check
Real User Monitoring, or RUM, provides data from anonymous user sessions. Much like analytics tracks traffic numbers, RUM looks at performance. The Average Load Time breakdown will tell you where you site is slow and what you can do to fix it. You can get geographic data to know which parts of the country have performance issues, or whether the mobile
Audit Your Account for Completeness
The final card to play when assessing providers is to do a quick account audit, where you detail the must and nice-to haves. How does Uptime.com match up? Is there a feature you had that you were missing? Reach out to support and ask us about it. We are glad to point you in the right direction, or record your idea in our roadmap.
As you can see, Uptime.com is always growing alongside your business.
Once you have gone through these steps, you should be fairly close to feature parity with your old provider. Of course, every setup is different but we hope this list helps make your migration a little less stressful and a lot more informative.
Minute-by-minute Uptime checks.
Start your 14-day free trial with no credit card required at Uptime.com.